×

使用NRF24L01、DHT11 DHT22的Arduino无线气象站

消耗积分:2 | 格式:zip | 大小:0.00 MB | 2022-10-28

贾虎世

分享资料个

描述

第 1 步:您需要什么

  • 2X Arduino UNO(或任何其他 Arduino)
  • 液晶 I2C 显示器 20X4
  • 2x nrf24l01 模块
  • 2X DHT11 或 DHT22 传感器
  • 跳线
  • Visuino 程序:下载 Visuino
 
poYBAGNYyxGAVV4IAAKfl6Vw980709.jpg
 
1 / 7
 

第 2 步:电路


pYYBAGNYyxSAVllkAAFBiZOHBY8553.jpg
 

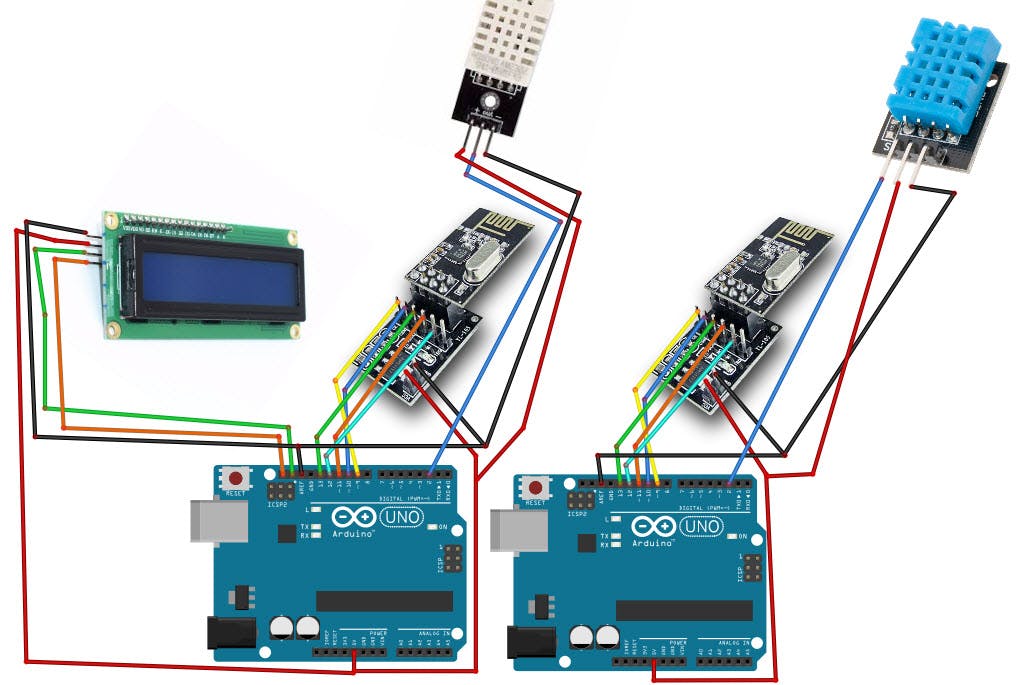
对于这个项目,我们使用 NRF24L01 模块和电压适配器。

接线发件人Arduino:

  • 将 NRF24L01 适配器引脚 [VCC] 连接到 Arduino 引脚 [5V]
  • 将 NRF24L01 适配器引脚 [GND] 连接到 Arduino 引脚 [GND]
  • 将 NRF24L01 适配器引脚“芯片启用”[CE] 连接到 Arduino 数字引脚 [9]
  • 将 NRF24L01 适配器引脚“芯片选择”[CSN] 连接到 Arduino 数字引脚 [10]
  • 将 NRF24L01 适配器引脚 [SCK] 连接到 Arduino 数字引脚 [13]
  • 将 NRF24L01 适配器引脚 [MO] 连接到 Arduino 数字引脚 [11]
  • 将 NRF24L01 适配器引脚 [MI] 连接到 Arduino 数字引脚 [12]
  • 将 DHT11 传感器引脚 [VCC] 连接到 Arduino 引脚 [5V]
  • 将 DHT11 传感器引脚 [GND] 连接到 Arduino 引脚 [GND]
  • 将 DHT11 传感器引脚 [OUT] 连接到 Arduino 数字引脚 [2]

连接接收器 Arduino:

  • 将 NRF24L01 适配器引脚 [VCC] 连接到 Arduino 引脚 [5V]
  • 将 NRF24L01 适配器引脚 [GND] 连接到 Arduino 引脚 [GND]
  • 将 NRF24L01 适配器引脚“芯片启用”[CE] 连接到 Arduino 数字引脚 [9]
  • 将 NRF24L01 适配器引脚“芯片选择”[CSN] 连接到 Arduino 数字引脚 [10]
  • 将 NRF24L01 适配器引脚 [SCK] 连接到 Arduino 数字引脚 [13]
  • 将 NRF24L01 适配器引脚 [MO] 连接到 Arduino 数字引脚 [11]
  • 将 NRF24L01 适配器引脚 [MI] 连接到 Arduino 数字引脚 [12]
  • 将 LCD 显示引脚 [SCL] 连接到 Arduino 引脚 [SCL]
  • 将 LCD 显示引脚 [SDA] 连接到 Arduino 引脚 [SDA]
  • 将 LCD 显示引脚 [VCC] 连接到 Arduino 引脚 [5v]
  • 将 LCD 显示引脚 [GND] 连接到 Arduino 引脚 [GND]
  • 将 DHT12 传感器引脚 [VCC] 连接到 Arduino 引脚 [5V
  • 将 DHT12 传感器引脚 [GND] 连接到 Arduino 引脚 [GND]
  • 将 DHT12 传感器引脚 [OUT] 连接到 Arduino 数字引脚 [2]

第 3 步:启动 Visuino,并选择 Arduino UNO 板类型


poYBAGNYyxaADzxnAABpoybbpus978.jpg
 
1 / 2
 

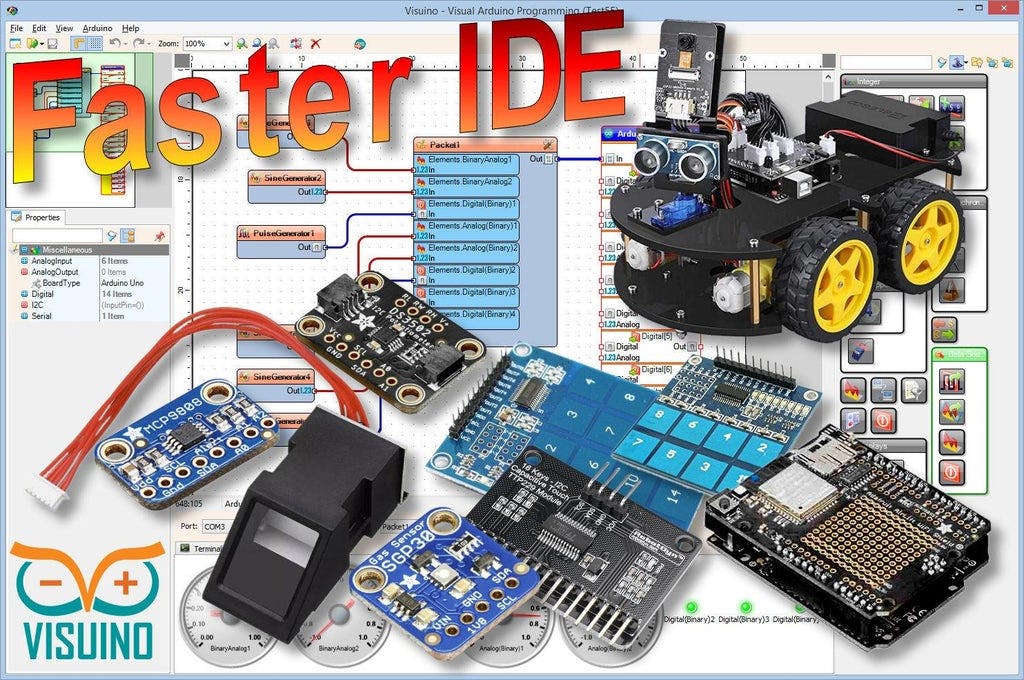
Visuino:https ://www.visuino.eu也需要安装。下载免费版本或注册免费试用。

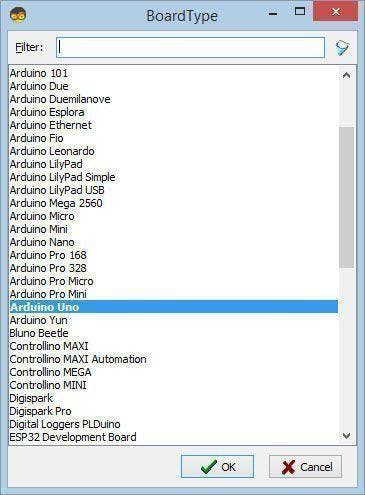
启动Visuino,如第一张图所示点击Visuino中Arduino组件(图1)上的“工具”按钮出现对话框时,选择“Arduino UNO”,如图2所示

第 4 步:对于 Sender Arduino - 在 Visuino 中添加、设置和连接组件


pYYBAGNYyxiAQxw7AAAUjAn2His554.jpg
 
1 / 6
 
  • 添加“ Make Structure ”组件
  • 添加“ NRF24L01 ”组件
  • 添加“ DHT ”组件
  • 双击“ MakeStructure1 ”并在“ Elements ”窗​​口中将2X“ Analog ”拖到左侧并关闭“Elements”窗​​口
  • 关闭“元素”窗口
  • 选择“ HumidityThermometer1 ”并在属性中将“类型”设置为您使用的传感器,DHT11、DHT22 等
  • 将“ HumidityThermometer1 ”引脚 [Temperature] 连接到“ MakeStructure1 ”>“ Analog1 ”引脚 [In]
  • 将“ HumidityThermometer1 ”引脚 [Humidity] 连接到“ MakeStructure1 ”>“ Analog2 ”引脚 [In]
  • 将“ HumidityThermometer1 ”引脚 [传感器] 连接到Arduino数字引脚 [2]
  • 将“ NRF24L011 ”引脚接口[SPI]连接到Arduino板引脚[SPI]
  • 将“ NRF24L011 ”引脚[Chip Select]连接到Arduino板数字引脚[10]
  • 将“ NRF24L011 ”引脚[Chip Enable]连接到Arduino板数字引脚[9]
  • 将“ MakeStructure1 ”引脚[Out]连接到“ NRF24L011 ”引脚[In]

将项目上传到 Arduino 板(请参阅生成、编译和上传 Arduino 代码步骤)

第 5 步:对于接收器 Arduino - 在 Visuino 添加、设置和连接组件


pYYBAGNYyxuAUgyqAAAhJrrBQpk645.jpg
 
1 / 20
 
  • 添加“ DHT ”组件
  • 添加“ LCD I2C ”组件
  • 添加“ NRF24L01 ”组件
  • 添加“拆分结构”组件
  • 选择“ HumidityThermometer1 ”并在属性中将“类型”设置为您使用的传感器,DHT11、DHT22 等
  • 双击“ SplitStructure1 ”并在“Elements”窗​​口中将 2X“Analog”拖到左侧
  • 关闭“元素”窗口
  • 选择“ LiquidCrystalDisplay1 ”并在属性窗口中将“Columns”设置为20,将“Rows”设置为4
  • 双击“ LiquidCrystalDisplay1 ”并在 Elements 窗口中将 4X“ Text Field ”和 4X“ Analog Field ”拖到左侧
  • 选择“ TextField1 ”,在属性窗口中将“ Initial Value ”设置为“TEMP:”,将“ Row ”设置为1,将“ Width ”设置为5
  • 选择“ TextField2 ”并在属性窗口中将“ Initial Value ”设置为“HUM::”,将“ Row ”设置为3,将“ Width ”设置为5
  • 选择“ TextField3 ”并在属性窗口中将“ Initial Value ”设置为“IN:”,将“ Column ”设置为 8,将“ Width ”设置为 2
  • 选择“ TextField4 ”,在属性窗口中将“ Initial Value ”设置为“OUT::”,将“ Column ”设置为15,将“ Width ”设置为3
  • 选择“ AnalogField1 ”并在属性窗口中将“ Column ”设置为 7,“ Row ”设置为 1,“ Width ”设置为 4
  • 选择“ AnalogField2 ”并在属性窗口中将“ Column ”设置为 7,“ Row ”设置为 3,“ Width ”设置为 4
  • 选择“ AnalogField3 ”并在属性窗口中将“ Column ”设置为 14,“ Row ”设置为 1,“ Width ”设置为 4
  • 选择“ AnalogField4 ”并在属性窗口中将“ Column ”设置为 14,“ Row ”设置为 3,“ Width ”设置为 4
  • 将“ NRF24L011 ”引脚接口[SPI]连接到Arduino板引脚[SPI]
  • 将“ NRF24L011 ”引脚[Chip Select]连接到Arduino板数字引脚[10]
  • 将“ NRF24L011 ”引脚[Chip Enable]连接到Arduino板数字引脚[9]
  • 将“ NRF24L011 ”引脚[Out]连接到“SplitStructure1”引脚[In]
  • 将“ HumidityThermometer1 ”引脚 [Temperature] 连接到“ LiquidCrystalDisplay1 ”>“ AnalogField1 ”引脚 [In]
  • 将“ HumidityThermometer1 ”引脚[湿度]连接到“ LiquidCrystalDisplay1 ”>“ AnalogField2 ”引脚[In]
  • 将“ HumidityThermometer1 ”引脚 [传感器] 连接到Arduino数字引脚 [2]
  • 将“ SplitStructure1 ”>“ Analog1 ”引脚 [Out] 连接到“ LiquidCrystalDisplay1 ”>“ AnalogField3 ”引脚 [In] 和引脚 [Clock]
  • 将“ SplitStructure1 ”>“ Analog2 ”引脚 [Out] 连接到“ LiquidCrystalDisplay1 ”>“ AnalogField4 ”引脚 [In] 和引脚 [Clock]
  • 将“ LiquidCrystalDisplay1 ”引脚 I2C [Out] 连接到Arduino引脚 I2C [In]

将项目上传到 Arduino 板(请参阅生成、编译和上传 Arduino 代码步骤)

第 6 步:生成、编译和上传 Arduino 代码


pYYBAGNYwJmAIY_YAACfDGtR8R0183.jpg
 

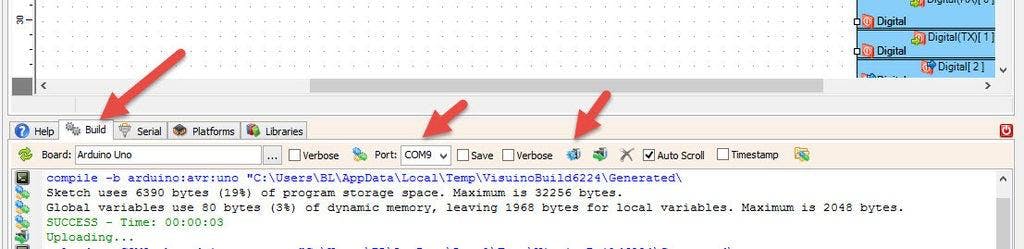
在 Visuino 中,在底部单击“构建”选项卡,确保选择了正确的端口,然后单击“编译/构建和上传”按钮。

第 7 步:播放

如果您为 Arduino 模块供电,连接到接收器 Arduino 的 LCD 显示器将开始显示内部的温度和湿度以及从发送器 Arduino 接收到的温度和湿度。

恭喜!您已经使用 Visuino 完成了您的项目。还附上了我为本教程创建的发送方和接收方的 Visuino 项目文件


声明:本文内容及配图由入驻作者撰写或者入驻合作网站授权转载。文章观点仅代表作者本人,不代表电子发烧友网立场。文章及其配图仅供工程师学习之用,如有内容侵权或者其他违规问题,请联系本站处理。 举报投诉

评论(0)
发评论

下载排行榜

全部0条评论

快来发表一下你的评论吧 !

'+ '

'+ '

'+ ''+ '
'+ ''+ ''+ '
'+ ''+ '' ); $.get('/article/vipdownload/aid/'+webid,function(data){ if(data.code ==5){ $(pop_this).attr('href',"/login/index.html"); return false } if(data.code == 2){ //跳转到VIP升级页面 window.location.href="//m.jibsdb.com/vip/index?aid=" + webid return false } //是会员 if (data.code > 0) { $('body').append(htmlSetNormalDownload); var getWidth=$("#poplayer").width(); $("#poplayer").css("margin-left","-"+getWidth/2+"px"); $('#tips').html(data.msg) $('.download_confirm').click(function(){ $('#dialog').remove(); }) } else { var down_url = $('#vipdownload').attr('data-url'); isBindAnalysisForm(pop_this, down_url, 1) } }); }); //是否开通VIP $.get('/article/vipdownload/aid/'+webid,function(data){ if(data.code == 2 || data.code ==5){ //跳转到VIP升级页面 $('#vipdownload>span').text("开通VIP 免费下载") return false }else{ // 待续费 if(data.code == 3) { vipExpiredInfo.ifVipExpired = true vipExpiredInfo.vipExpiredDate = data.data.endoftime } $('#vipdownload .icon-vip-tips').remove() $('#vipdownload>span').text("VIP免积分下载") } }); }).on("click",".download_cancel",function(){ $('#dialog').remove(); }) var setWeixinShare={};//定义默认的微信分享信息,页面如果要自定义分享,直接更改此变量即可 if(window.navigator.userAgent.toLowerCase().match(/MicroMessenger/i) == 'micromessenger'){ var d={ title:'使用NRF24L01、DHT11 DHT22的Arduino无线气象站',//标题 desc:$('[name=description]').attr("content"), //描述 imgUrl:'https://'+location.host+'/static/images/ele-logo.png',// 分享图标,默认是logo link:'',//链接 type:'',// 分享类型,music、video或link,不填默认为link dataUrl:'',//如果type是music或video,则要提供数据链接,默认为空 success:'', // 用户确认分享后执行的回调函数 cancel:''// 用户取消分享后执行的回调函数 } setWeixinShare=$.extend(d,setWeixinShare); $.ajax({ url:"https://www.elecfans.com/app/wechat/index.php?s=Home/ShareConfig/index", data:"share_url="+encodeURIComponent(location.href)+"&format=jsonp&domain=m", type:'get', dataType:'jsonp', success:function(res){ if(res.status!="successed"){ return false; } $.getScript('https://res.wx.qq.com/open/js/jweixin-1.0.0.js',function(result,status){ if(status!="success"){ return false; } var getWxCfg=res.data; wx.config({ //debug: true, // 开启调试模式,调用的所有api的返回值会在客户端alert出来,若要查看传入的参数,可以在pc端打开,参数信息会通过log打出,仅在pc端时才会打印。 appId:getWxCfg.appId, // 必填,公众号的唯一标识 timestamp:getWxCfg.timestamp, // 必填,生成签名的时间戳 nonceStr:getWxCfg.nonceStr, // 必填,生成签名的随机串 signature:getWxCfg.signature,// 必填,签名,见附录1 jsApiList:['onMenuShareTimeline','onMenuShareAppMessage','onMenuShareQQ','onMenuShareWeibo','onMenuShareQZone'] // 必填,需要使用的JS接口列表,所有JS接口列表见附录2 }); wx.ready(function(){ //获取“分享到朋友圈”按钮点击状态及自定义分享内容接口 wx.onMenuShareTimeline({ title: setWeixinShare.title, // 分享标题 link: setWeixinShare.link, // 分享链接 imgUrl: setWeixinShare.imgUrl, // 分享图标 success: function () { setWeixinShare.success; // 用户确认分享后执行的回调函数 }, cancel: function () { setWeixinShare.cancel; // 用户取消分享后执行的回调函数 } }); //获取“分享给朋友”按钮点击状态及自定义分享内容接口 wx.onMenuShareAppMessage({ title: setWeixinShare.title, // 分享标题 desc: setWeixinShare.desc, // 分享描述 link: setWeixinShare.link, // 分享链接 imgUrl: setWeixinShare.imgUrl, // 分享图标 type: setWeixinShare.type, // 分享类型,music、video或link,不填默认为link dataUrl: setWeixinShare.dataUrl, // 如果type是music或video,则要提供数据链接,默认为空 success: function () { setWeixinShare.success; // 用户确认分享后执行的回调函数 }, cancel: function () { setWeixinShare.cancel; // 用户取消分享后执行的回调函数 } }); //获取“分享到QQ”按钮点击状态及自定义分享内容接口 wx.onMenuShareQQ({ title: setWeixinShare.title, // 分享标题 desc: setWeixinShare.desc, // 分享描述 link: setWeixinShare.link, // 分享链接 imgUrl: setWeixinShare.imgUrl, // 分享图标 success: function () { setWeixinShare.success; // 用户确认分享后执行的回调函数 }, cancel: function () { setWeixinShare.cancel; // 用户取消分享后执行的回调函数 } }); //获取“分享到腾讯微博”按钮点击状态及自定义分享内容接口 wx.onMenuShareWeibo({ title: setWeixinShare.title, // 分享标题 desc: setWeixinShare.desc, // 分享描述 link: setWeixinShare.link, // 分享链接 imgUrl: setWeixinShare.imgUrl, // 分享图标 success: function () { setWeixinShare.success; // 用户确认分享后执行的回调函数 }, cancel: function () { setWeixinShare.cancel; // 用户取消分享后执行的回调函数 } }); //获取“分享到QQ空间”按钮点击状态及自定义分享内容接口 wx.onMenuShareQZone({ title: setWeixinShare.title, // 分享标题 desc: setWeixinShare.desc, // 分享描述 link: setWeixinShare.link, // 分享链接 imgUrl: setWeixinShare.imgUrl, // 分享图标 success: function () { setWeixinShare.success; // 用户确认分享后执行的回调函数 }, cancel: function () { setWeixinShare.cancel; // 用户取消分享后执行的回调函数 } }); }); }); } }); } function openX_ad(posterid, htmlid, width, height) { if ($(htmlid).length > 0) { var randomnumber = Math.random(); var now_url = encodeURIComponent(window.location.href); var ga = document.createElement('iframe'); ga.src = 'https://www1.elecfans.com/www/delivery/myafr.php?target=_blank&cb=' + randomnumber + '&zoneid=' + posterid+'&prefer='+now_url; ga.width = width; ga.height = height; ga.frameBorder = 0; ga.scrolling = 'no'; var s = $(htmlid).append(ga); } } openX_ad(828, '#berry-300', 300, 250);