×

使用System IO Ports SerialPort进行串行读/写

消耗积分:0 | 格式:zip | 大小:0.19 MB | 2022-11-21

分享资料个

描述

描述

.NET Core 3.0 刚刚在 2019 年 1 月发布了预览版。正如微软在他们的文档中所说,Linux 现在支持 System.IO.Ports.SerialPort。我迫不及待地想用它弄脏我的手。在本文中,我将向您展示如何使用 System.IO.Ports.SerialPort 进行串行读/写,以及如何在 Windows 上构建源代码并在 linux-arm (Raspbian) 上运行二进制文件。

笔记

  • 在我写这篇文章的时候,.NET CoreSystem.IO.Ports已经处于预览阶段,当你阅读这篇文章时,请检查是否有任何新版本。使用最新的稳定版本运行您的代码。
  • 我在 Windows 10 上构建和测试本文的代码,并在 Raspberry Pi Raspbian 中运行它们。如果您使用 Mac/Linux 作为开发机器,SerialPort 库也应该可以工作

开发设置

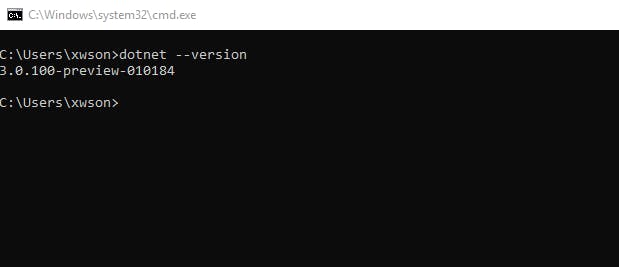
1. 在您的开发机器上下载并安装.NET Core 3.0 SDK(非运行时)。安装后,打开终端,输入dotnet --version. 您应该会看到像 3.0.x 这样的 dotnet 版本。

 
poYBAGN2-JmAKHkwAAAYnfElk1Q136.png
 

2. 安装Visual Studio Code作为 C# 代码编辑器。然后安装C# 扩展

3. 在树莓派上安装.NET Core。如果你想在开发机器上构建 C# 代码并在 PI 上运行二进制文件,你只需要安装.NET Runtime. 如果要在 PI 上构建和运行源代码,则需要安装.NET SDK其中还包括 .Net Runtime。请注意,您应该linux arm32为您的 PI 使用构建。为简单起见,我将向您展示如何在 PI 上安装 .NET Core SDK:

# in raspberry pi terminal
sudo apt-get update
# install .net core dependencies
sudo apt-get install curl libunwind8 gettext
cd ~
# download .net core 3.0
wget 
mkdir -p $HOME/dotnet && tar vzxf dotnet-sdk-3.0.100-preview-010184-linux-arm.tar.gz -C $HOME/dotnet
echo "export PATH=$PATH:$HOME/dotnet" >> ~/.bashrc
echo "export DOTNET_ROOT=$HOME/dotnet" >> ~/.bashrc
export PATH=$PATH:$HOME/dotnet
export DOTNET_ROOT=$HOME/dotnet

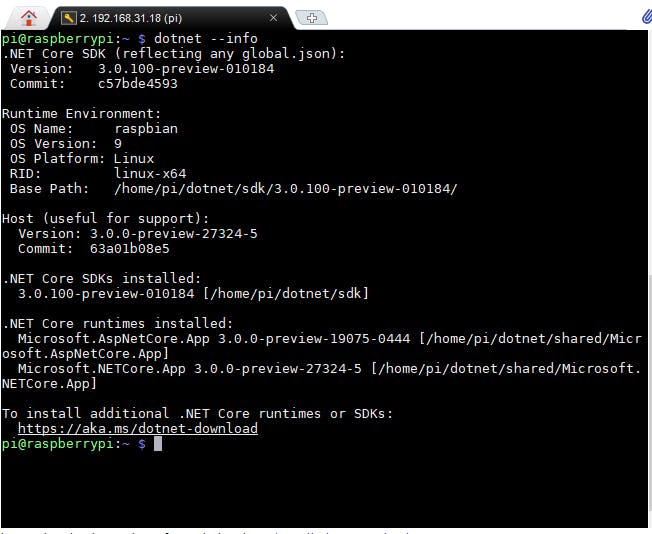
安装后,使用 dotnet --info 进行验证。你应该看到这样的安装信息:

 
poYBAGN2-JyAMGr3AAC8iO_mAlo628.png
 

4. 准备任何启用串行功能的设备以接收和发送串行消息。对我来说,这是一个 Arduino Uno。

你好串行端口

设置好开发工具后,让我们从一个简单的 C# 项目开始我们的旅程,该项目将打印所有可用的串行端口。

在您的开发机器上,使用以下命令启动一个 dotnet 项目:

mkdir hello-serialport && cd hello-serialport
dotnet new console
dotnet add package System.IO.Ports --version 4.6.0-preview.19073.11

打开program.cs文件,将内容替换为以下代码:

using System;
using System.IO.Ports;
namespace hello_serialport
{ 
   class Program    {        
      static void Main(string[] args)        {             // Get a list of serial port names.             string[] ports = SerialPort.GetPortNames();             Console.WriteLine("The following serial ports were found:");             // Display each port name to the console.             foreach(string port in ports)             {                 Console.WriteLine(port);             }             Console.ReadLine();        }    }}

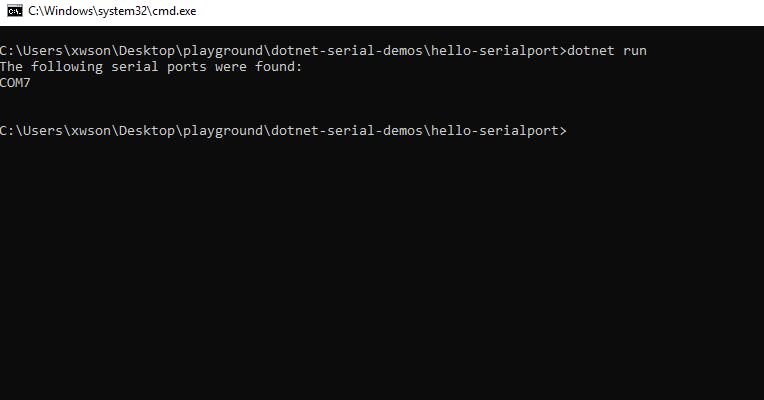
键入dotnet run以在开发机器上运行代码。

 
poYBAGN2-J6ALskGAAAtSlUGISE364.png
 

要为 RPi 构建项目,请运行:

dotnet publish -r linux-arm --self-contained false

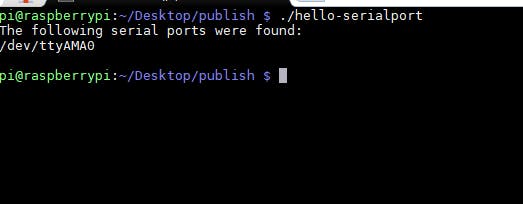
然后转到{your_project_root}\bin\Debug\netcoreapp3.0\linux-arm,将文件夹复制publish 到您的 PI。在 Pi 上,转到发布文件夹,运行:

chmod +x hello-serialport
./hello-serialport

您的 hello-serialport 正在 Rapsberry Pi 上运行!

 
poYBAGN2-KCAAH-FAAAkGaodXZo036.png
 

.NET Core 应用程序部署

在 hello serialport 项目中,我们在 windows 上进行开发,构建 linux-arm 二进制文件,然后在 raspberry pi 上运行二进制文件。根据微软的文档,我们刚刚制作了一个依赖于框架的可执行文件(FDE),这意味着该可执行文件只能在安装了正确版本的 .NET Core Runtime 的树莓派上运行。

您可以通过参考以下文档来玩不同类型的部署:

串行读取

打开 Arduino IDE,转到 File-->Examples-->03.Analog-->AnalogInOutSerial 并将其上传到 Arduino。在此处粘贴代码:

/*
 Analog input, analog output, serial output
 Reads an analog input pin, maps the result to a range from 0 to 255 and uses
 the result to set the pulse width modulation (PWM) of an output pin.
 Also prints the results to the Serial Monitor.
 The circuit:
 - potentiometer connected to analog pin 0.
   Center pin of the potentiometer goes to the analog pin.
   side pins of the potentiometer go to +5V and ground
 - LED connected from digital pin 9 to ground
 created 29 Dec. 2008
 modified 9 Apr 2012
 by Tom Igoe
 This example code is in the public domain.
 http://www.arduino.cc/en/Tutorial/AnalogInOutSerial
*/
  
const int analogInPin = A0;  // Analog input pin that the potentiometer is attached to
const int analogOutPin = 9; // Analog output pin that the LED is attached to
int sensorValue = 0;        // value read from the pot
int outputValue = 0;        // value output to the PWM (analog out)
void setup() {
 // initialize serial communications at 9600 bps:
 Serial.begin(9600);
}
void loop() {
 // read the analog in value:
 sensorValue = analogRead(analogInPin);
 // map it to the range of the analog out:
 outputValue = map(sensorValue, 0, 1023, 0, 255);
 // change the analog out value:
 analogWrite(analogOutPin, outputValue);
 // print the results to the Serial Monitor:
 Serial.print("sensor = ");
 Serial.print(sensorValue);
 Serial.print("\t output = ");
 Serial.println(outputValue);
 // wait 2 milliseconds before the next loop for the analog-to-digital
 // converter to settle after the last reading:
 delay(2);
}

该程序不断发出模拟引脚的读数。让我们编写一个 C# 程序来读取消息:

using System;
using System.IO.Ports;
namespace serial_read
{
class Program
{
  static SerialPort _serialPort;
  static void Main(string[] args)
  {
    Console.Write("Port no: ");
    string port = Console.ReadLine();
    Console.Write("baudrate: ");
    string baudrate = Console.ReadLine();
    // Create a new SerialPort on port COM7
    _serialPort = new SerialPort(port, int.Parse(baudrate));
    // Set the read/write timeouts
    _serialPort.ReadTimeout = 1500;
    _serialPort.WriteTimeout = 1500;
    _serialPort.Open();
    while (true)
    {
      Read();
    }
    _serialPort.Close();
  }

  public static void Read()
  {
    try
    {
      string message = _serialPort.ReadLine();
      Console.WriteLine(message);
    }
    catch (TimeoutException) { }
  }
}
}

在 Raspberry Pi 上构建并运行:

 
poYBAGN2-KKAZE3rAAEg4pN-vg0324.png
 

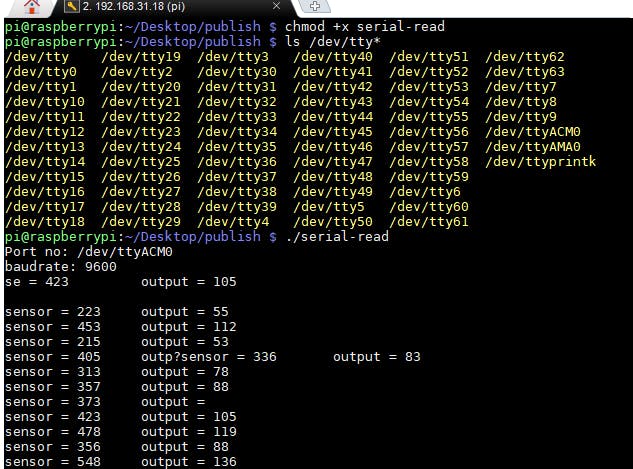
值得一提的是 SerialPort.ReadLine() 是一种阻塞方法。如果您不希望主线程被阻塞,请使用多线程。

请参考微软提供的例子来学习如何进行串行写入和多线程。系列活动也是值得探索的好东西。

进一步的工作

  • ASP.NET Core 从 .NET Core v1 开始可用。通过结合 SerialPort API 和 ASP.NET,我们可以构建一个 Web UI 来控制一些设备,比如移动机器人。
  • Microsoft 开源了WPFWinForms ,它们都将从 .NET Core 3.0 开始提供。有一天,我们可以安全地将旧的 Windows 桌面串行应用程序移植到所有平台,甚至可以在 Raspberry Pi 上编写一个 winForm 串行通信应用程序!

参考

[1] 在 Raspberry Pi 上安装 .NET Core 2.x SDK 并使用 System.Device.Gpio 闪烁 LED。


声明:本文内容及配图由入驻作者撰写或者入驻合作网站授权转载。文章观点仅代表作者本人,不代表电子发烧友网立场。文章及其配图仅供工程师学习之用,如有内容侵权或者其他违规问题,请联系本站处理。 举报投诉

评论(0)
发评论

下载排行榜

全部0条评论

快来发表一下你的评论吧 !

'+ '

'+ '

'+ ''+ '
'+ ''+ ''+ '
'+ ''+ '' ); $.get('/article/vipdownload/aid/'+webid,function(data){ if(data.code ==5){ $(pop_this).attr('href',"/login/index.html"); return false } if(data.code == 2){ //跳转到VIP升级页面 window.location.href="//m.jibsdb.com/vip/index?aid=" + webid return false } //是会员 if (data.code > 0) { $('body').append(htmlSetNormalDownload); var getWidth=$("#poplayer").width(); $("#poplayer").css("margin-left","-"+getWidth/2+"px"); $('#tips').html(data.msg) $('.download_confirm').click(function(){ $('#dialog').remove(); }) } else { var down_url = $('#vipdownload').attr('data-url'); isBindAnalysisForm(pop_this, down_url, 1) } }); }); //是否开通VIP $.get('/article/vipdownload/aid/'+webid,function(data){ if(data.code == 2 || data.code ==5){ //跳转到VIP升级页面 $('#vipdownload>span').text("开通VIP 免费下载") return false }else{ // 待续费 if(data.code == 3) { vipExpiredInfo.ifVipExpired = true vipExpiredInfo.vipExpiredDate = data.data.endoftime } $('#vipdownload .icon-vip-tips').remove() $('#vipdownload>span').text("VIP免积分下载") } }); }).on("click",".download_cancel",function(){ $('#dialog').remove(); }) var setWeixinShare={};//定义默认的微信分享信息,页面如果要自定义分享,直接更改此变量即可 if(window.navigator.userAgent.toLowerCase().match(/MicroMessenger/i) == 'micromessenger'){ var d={ title:'使用System IO Ports SerialPort进行串行读/写',//标题 desc:$('[name=description]').attr("content"), //描述 imgUrl:'https://'+location.host+'/static/images/ele-logo.png',// 分享图标,默认是logo link:'',//链接 type:'',// 分享类型,music、video或link,不填默认为link dataUrl:'',//如果type是music或video,则要提供数据链接,默认为空 success:'', // 用户确认分享后执行的回调函数 cancel:''// 用户取消分享后执行的回调函数 } setWeixinShare=$.extend(d,setWeixinShare); $.ajax({ url:"https://www.elecfans.com/app/wechat/index.php?s=Home/ShareConfig/index", data:"share_url="+encodeURIComponent(location.href)+"&format=jsonp&domain=m", type:'get', dataType:'jsonp', success:function(res){ if(res.status!="successed"){ return false; } $.getScript('https://res.wx.qq.com/open/js/jweixin-1.0.0.js',function(result,status){ if(status!="success"){ return false; } var getWxCfg=res.data; wx.config({ //debug: true, // 开启调试模式,调用的所有api的返回值会在客户端alert出来,若要查看传入的参数,可以在pc端打开,参数信息会通过log打出,仅在pc端时才会打印。 appId:getWxCfg.appId, // 必填,公众号的唯一标识 timestamp:getWxCfg.timestamp, // 必填,生成签名的时间戳 nonceStr:getWxCfg.nonceStr, // 必填,生成签名的随机串 signature:getWxCfg.signature,// 必填,签名,见附录1 jsApiList:['onMenuShareTimeline','onMenuShareAppMessage','onMenuShareQQ','onMenuShareWeibo','onMenuShareQZone'] // 必填,需要使用的JS接口列表,所有JS接口列表见附录2 }); wx.ready(function(){ //获取“分享到朋友圈”按钮点击状态及自定义分享内容接口 wx.onMenuShareTimeline({ title: setWeixinShare.title, // 分享标题 link: setWeixinShare.link, // 分享链接 imgUrl: setWeixinShare.imgUrl, // 分享图标 success: function () { setWeixinShare.success; // 用户确认分享后执行的回调函数 }, cancel: function () { setWeixinShare.cancel; // 用户取消分享后执行的回调函数 } }); //获取“分享给朋友”按钮点击状态及自定义分享内容接口 wx.onMenuShareAppMessage({ title: setWeixinShare.title, // 分享标题 desc: setWeixinShare.desc, // 分享描述 link: setWeixinShare.link, // 分享链接 imgUrl: setWeixinShare.imgUrl, // 分享图标 type: setWeixinShare.type, // 分享类型,music、video或link,不填默认为link dataUrl: setWeixinShare.dataUrl, // 如果type是music或video,则要提供数据链接,默认为空 success: function () { setWeixinShare.success; // 用户确认分享后执行的回调函数 }, cancel: function () { setWeixinShare.cancel; // 用户取消分享后执行的回调函数 } }); //获取“分享到QQ”按钮点击状态及自定义分享内容接口 wx.onMenuShareQQ({ title: setWeixinShare.title, // 分享标题 desc: setWeixinShare.desc, // 分享描述 link: setWeixinShare.link, // 分享链接 imgUrl: setWeixinShare.imgUrl, // 分享图标 success: function () { setWeixinShare.success; // 用户确认分享后执行的回调函数 }, cancel: function () { setWeixinShare.cancel; // 用户取消分享后执行的回调函数 } }); //获取“分享到腾讯微博”按钮点击状态及自定义分享内容接口 wx.onMenuShareWeibo({ title: setWeixinShare.title, // 分享标题 desc: setWeixinShare.desc, // 分享描述 link: setWeixinShare.link, // 分享链接 imgUrl: setWeixinShare.imgUrl, // 分享图标 success: function () { setWeixinShare.success; // 用户确认分享后执行的回调函数 }, cancel: function () { setWeixinShare.cancel; // 用户取消分享后执行的回调函数 } }); //获取“分享到QQ空间”按钮点击状态及自定义分享内容接口 wx.onMenuShareQZone({ title: setWeixinShare.title, // 分享标题 desc: setWeixinShare.desc, // 分享描述 link: setWeixinShare.link, // 分享链接 imgUrl: setWeixinShare.imgUrl, // 分享图标 success: function () { setWeixinShare.success; // 用户确认分享后执行的回调函数 }, cancel: function () { setWeixinShare.cancel; // 用户取消分享后执行的回调函数 } }); }); }); } }); } function openX_ad(posterid, htmlid, width, height) { if ($(htmlid).length > 0) { var randomnumber = Math.random(); var now_url = encodeURIComponent(window.location.href); var ga = document.createElement('iframe'); ga.src = 'https://www1.elecfans.com/www/delivery/myafr.php?target=_blank&cb=' + randomnumber + '&zoneid=' + posterid+'&prefer='+now_url; ga.width = width; ga.height = height; ga.frameBorder = 0; ga.scrolling = 'no'; var s = $(htmlid).append(ga); } } openX_ad(828, '#berry-300', 300, 250);