×

可以给主人提供生活建议的机器人开源

消耗积分:2 | 格式:zip | 大小:1.77 MB | 2022-11-04

安德森大

分享资料个

描述

我想制作一个可以给她的主人提供生活建议的机器人。机器人可以告诉温度、湿度、时间和警报等。这只是一个初始版本。我会给这个机器人更多的功能,比如声音识别、扬声器、游戏。因此,Arduino UNO R3 可能不足以完成这个项目。如果有人有有趣的想法,请给予赞扬。让我们尝试构建这个机器人。让我介绍一下这个项目:

1. LCD自定义显示——眨眼脸

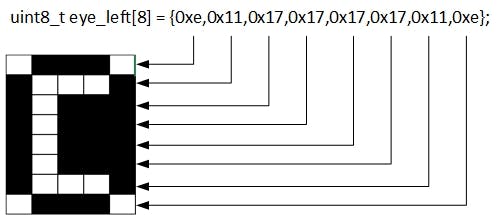
20x4 LCD 允许用户创建自定义字符。这对我塑造脸型有好处。此 LCD 在屏幕中包含 80 个字符。每个字符包括 8 行 5 列,总共有 40 个像素。字符的每一行都有一个对应的代码(数字)。要构建自定义字符,我需要构建一个 8 字节自定义类型变量。例如,在上图中创建机器人眼睛角色。代码是:

uint8_t eye_left[8] = {0xe,0x11,0x17,0x17,0x17,0x17,0x11,0xe};

根据我的实验,LCD字符的行码是有规律的。我显示下表以显示行显示和相应的数字:
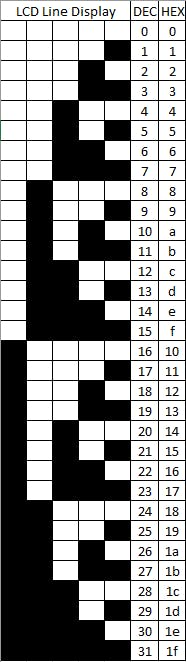
 
poYBAGNkbn-AUNpYAABdkzL_x7g667.png
LCD行(行)显示及对应编号
 

根据上表,眼睛显示代码解释如下:

 
pYYBAGNkboKAK3U6AAAs35bdVhg132.jpg
 

创建自定义代码后,即可在 Arduino setup() 或 loop() 中使用。在 setup() 中,例如,程序代码是:

// .... the LCD library and address setup is not here ...
//variable code for custom eye character
uint8_t eye_left[8] = {0xe,0x11,0x17,0x17,0x17,0x17,0x11,0xe};
void setup() {
     lcd.begin(20,4); 
     lcd.createChar(2, eye_left);//use number '2' to mark this char
     lcd.setCursor(1,1);// display position
     lcd.write(2);// display the custom char
     lcd.setCursor(3,1);
     lcd.write(2);
}

我不会在上面的代码中给出 LCD 库和地址设置。这是显示面部和眨眼的测试代码:

#include 
#include 
uint8_t empty[8]  = {0x0,0x0,0x0,0x0,0x0,0x0,0x0,0x1};
uint8_t eyebrow_happy[8]  = {0x0,0x0,0x0,0xe,0x11,0x0,0x0,0x0};
uint8_t eyebrow_angry_right[8]  = {0x0,0x0,0x0,0x10,0x8,0x4,0x2,0x1};
uint8_t eyebrow_close[8]  = {0x0,0x0,0x0,0x0,0x0,0x0,0x0,0x1f};
uint8_t eyebrow_angry_left[8]  = {0x0,0x0,0x0,0x1,0x2,0x4,0x8,0x10};
uint8_t eye_left[8] = {0xe,0x11,0x17,0x17,0x17,0x17,0x11,0xe};
uint8_t eye_right[8] = {0xe,0x11,0x1d,0x1d,0x1d,0x1d,0x11,0xe};
uint8_t eye_front[8] = {0xe,0x11,0x15,0x15,0x15,0x15,0x11,0xe};
uint8_t eye_close[8] = {0x0,0x0,0x0,0x11,0x1f,0x0,0x0,0x0};
uint8_t mouth_happy[8]  = {0x4,0xe,0xe,0x0,0x0,0x11,0xe};
uint8_t mouth_sad[8] = {0x4,0xe,0xe,0x0,0x0,0xe,0x11};
LiquidCrystal_I2C lcd(0x3f, 2, 1, 0, 4, 5, 6, 7, 3, POSITIVE);  // Set the LCD I2C address
void setup() {
   lcd.begin(20,4); 
   //lcd.init(); 
   lcd.createChar(0, empty);
   lcd.createChar(1, mouth_sad);
   lcd.createChar(2, eyebrow_angry_right);
   lcd.createChar(3, eyebrow_angry_left);
   lcd.createChar(4, eye_left);
   lcd.createChar(5, eye_right);
   lcd.createChar(6, eye_front);
   lcd.createChar(7, eye_close);
   lcd.createChar(8, mouth_happy);
   lcd.createChar(9, eyebrow_happy);
   lcd.createChar(10, eyebrow_close);
   lcd.home();
   // eyebrow
   lcd.setCursor(1,0);
   lcd.write(1);
   lcd.setCursor(3,0);
   lcd.write(1);
   // eyes
   lcd.setCursor(1,1);
   lcd.write(4);
   lcd.setCursor(3,1);
   lcd.write(4);
   // mouth
   lcd.setCursor(2,2);
   lcd.write(8);
   // words
   lcd.setCursor(9,1);
   lcd.print("Hello!!");
   lcd.setCursor(8,2);
   lcd.print("I am Lily!");
   delay(1000);
}
//string str[20];
void loop() {
   // blink eyes
   delay(4000);
   // eyebrow
   lcd.setCursor(1,0);
   lcd.write(10);
   lcd.setCursor(3,0);
   lcd.write(10);
   // eyes
   lcd.setCursor(1,1);
   lcd.write(7);
   lcd.setCursor(3,1);
   lcd.write(7);
   // mouth
   lcd.setCursor(2,2);
   lcd.write(8);
   delay(250);
   // eyebrow
   lcd.setCursor(1,0);
   lcd.write(1);
   lcd.setCursor(3,0);
   lcd.write(1);
   // eyes
   lcd.setCursor(1,1);
   lcd.write(4);
   lcd.setCursor(3,1);
   lcd.write(4);
   // mouth
   lcd.setCursor(2,2);
   lcd.write(8);
}

我的液晶显示器是 I2C 型号。如果某人尝试此代码,请按照您的菜单设置您的 LCD。我在下面给出了 LCD 设置的链接:

2.时钟显示和时间/闹钟设置

我的 Arduino UNO 没有外部计时器 (RTC),但我自己制作时钟并使用 EEPROM 存储当前时间以进行 Arduino 重置。定时器/时钟项目在下面的链接中:

这是我的 Arduino DIY 时钟项目。它还介绍了 IR 远程设置、蜂鸣器运行和 EEPROM 库。

3.温湿度模式

我使用 DHT11 湿度和温度模型来获取该项目的湿度和温度。在程序中,我使用库“ DHT.h ”来应用模式。我还使用 Simon Monk 的“ timer.h ”库每 3 秒获取 Humi 和 Temp。(另外项目中的 eye's blink 也是使用这个库。)

4. 摇杆控制脸眼

Joy 贴纸很容易与 Arduino 一起使用。我创建了一个程序来查看我玩快乐贴纸时的 x、y 值。在下面的代码中,我使用我的 LCD 来显示 x、y 值:

#include 
#include 
LiquidCrystal_I2C lcd(0x3f, 2, 1, 0, 4, 5, 6, 7, 3, POSITIVE);  // Set the LCD I2C address
// Arduino pin numbers
const int SW_pin = 7; // digital pin connected to switch output
const int X_pin = A0; // analog pin connected to X output
const int Y_pin = A1; // analog pin connected to Y output
void setup() {
 pinMode(SW_pin, INPUT);
 digitalWrite(SW_pin, HIGH);
 lcd.begin(20,4);    
 lcd.clear();
}
void loop() {
 lcd.clear();
 lcd.setCursor(0,0);
 lcd.print("swtich: ");
 lcd.print(digitalRead(SW_pin));
 lcd.setCursor(0,1);
 lcd.print("X-axis: ");
 lcd.print(analogRead(X_pin));
 lcd.setCursor(0,2);
 lcd.print("Y-axis: ");
 lcd.print(analogRead(Y_pin));
 delay(500);
}

欢乐贴的原理在这个链接:

https://www.brainy-bits.com/arduino-joystick-tutorial/

我的项目视频


五、存在的问题和今后的工作

该项目将许多模型链接在一起,并使用了可能的库。好在没有冲突,但还是有一些问题。也许,某人可以给我建议。

首先,我一开始只能创建8个自定义角色,超过8个就麻烦了。例如,使用下面的代码。

   lcd.createChar(0, empty);
   lcd.createChar(1, mouth_sad);
   lcd.createChar(2, eyebrow_angry_right);
   lcd.createChar(3, eyebrow_angry_left);
   lcd.createChar(4, eye_left);
   lcd.createChar(5, eye_right);
   lcd.createChar(6, eye_front);
   lcd.createChar(7, eye_close);
   lcd.createChar(8, mouth_happy);
   lcd.createChar(9, eyebrow_happy);
   lcd.createChar(10, eyebrow_close);

字符“0”将替换为字符“8”,“1”将替换为“9”,“2”将替换为“10”。为了解决这个问题,我只是在每次显示字符之前构建字符。如果我改变眼睛字符以显示向上或向下看,我会这样做:

 lcd.createChar(2, eye_up);// create look up
 lcd.setCursor(1,1);
 lcd.write(2);
 lcd.setCursor(3,1);
 lcd.write(2);
 delay(1000);// delay 1s
 lcd.createChar(2, eye_down);//create look down
 lcd.setCursor(1,1);
 lcd.write(2);
 lcd.setCursor(3,1);
 lcd.write(2);

我不知道为什么我不能一起建立更多的角色。可能是液晶内存不够。谁能告诉我?

其次,我使用 Simon 的“ timer.h ”来显示眨眼。但是,这个库只是通过切换显示闭眼,我给了 250 毫秒的延迟时间来清楚地显示闭眼,但延迟会阻止整个代码运行。当脸部眨眼时,您可以看到第二次增加有一点时间问题。

我考虑使用普通计时器(如“millis()”)来毫不拖延地控制它,但它很复杂。我不知道millis() 的值是否会溢出。

第三,红外遥控器不灵敏。你可以从视频中看到这一点。也许,我的代码延迟太长,无法按下按钮,但我发现有时 IR 接收器会得到错误的按钮地址。为什么电视和投影仪遥控器效果很好?有人知道更多吗?


声明:本文内容及配图由入驻作者撰写或者入驻合作网站授权转载。文章观点仅代表作者本人,不代表电子发烧友网立场。文章及其配图仅供工程师学习之用,如有内容侵权或者其他违规问题,请联系本站处理。 举报投诉

评论(0)
发评论

下载排行榜

全部0条评论

快来发表一下你的评论吧 !

'+ '

'+ '

'+ ''+ '
'+ ''+ ''+ '
'+ ''+ '' ); $.get('/article/vipdownload/aid/'+webid,function(data){ if(data.code ==5){ $(pop_this).attr('href',"/login/index.html"); return false } if(data.code == 2){ //跳转到VIP升级页面 window.location.href="//m.jibsdb.com/vip/index?aid=" + webid return false } //是会员 if (data.code > 0) { $('body').append(htmlSetNormalDownload); var getWidth=$("#poplayer").width(); $("#poplayer").css("margin-left","-"+getWidth/2+"px"); $('#tips').html(data.msg) $('.download_confirm').click(function(){ $('#dialog').remove(); }) } else { var down_url = $('#vipdownload').attr('data-url'); isBindAnalysisForm(pop_this, down_url, 1) } }); }); //是否开通VIP $.get('/article/vipdownload/aid/'+webid,function(data){ if(data.code == 2 || data.code ==5){ //跳转到VIP升级页面 $('#vipdownload>span').text("开通VIP 免费下载") return false }else{ // 待续费 if(data.code == 3) { vipExpiredInfo.ifVipExpired = true vipExpiredInfo.vipExpiredDate = data.data.endoftime } $('#vipdownload .icon-vip-tips').remove() $('#vipdownload>span').text("VIP免积分下载") } }); }).on("click",".download_cancel",function(){ $('#dialog').remove(); }) var setWeixinShare={};//定义默认的微信分享信息,页面如果要自定义分享,直接更改此变量即可 if(window.navigator.userAgent.toLowerCase().match(/MicroMessenger/i) == 'micromessenger'){ var d={ title:'可以给主人提供生活建议的机器人开源',//标题 desc:$('[name=description]').attr("content"), //描述 imgUrl:'https://'+location.host+'/static/images/ele-logo.png',// 分享图标,默认是logo link:'',//链接 type:'',// 分享类型,music、video或link,不填默认为link dataUrl:'',//如果type是music或video,则要提供数据链接,默认为空 success:'', // 用户确认分享后执行的回调函数 cancel:''// 用户取消分享后执行的回调函数 } setWeixinShare=$.extend(d,setWeixinShare); $.ajax({ url:"https://www.elecfans.com/app/wechat/index.php?s=Home/ShareConfig/index", data:"share_url="+encodeURIComponent(location.href)+"&format=jsonp&domain=m", type:'get', dataType:'jsonp', success:function(res){ if(res.status!="successed"){ return false; } $.getScript('https://res.wx.qq.com/open/js/jweixin-1.0.0.js',function(result,status){ if(status!="success"){ return false; } var getWxCfg=res.data; wx.config({ //debug: true, // 开启调试模式,调用的所有api的返回值会在客户端alert出来,若要查看传入的参数,可以在pc端打开,参数信息会通过log打出,仅在pc端时才会打印。 appId:getWxCfg.appId, // 必填,公众号的唯一标识 timestamp:getWxCfg.timestamp, // 必填,生成签名的时间戳 nonceStr:getWxCfg.nonceStr, // 必填,生成签名的随机串 signature:getWxCfg.signature,// 必填,签名,见附录1 jsApiList:['onMenuShareTimeline','onMenuShareAppMessage','onMenuShareQQ','onMenuShareWeibo','onMenuShareQZone'] // 必填,需要使用的JS接口列表,所有JS接口列表见附录2 }); wx.ready(function(){ //获取“分享到朋友圈”按钮点击状态及自定义分享内容接口 wx.onMenuShareTimeline({ title: setWeixinShare.title, // 分享标题 link: setWeixinShare.link, // 分享链接 imgUrl: setWeixinShare.imgUrl, // 分享图标 success: function () { setWeixinShare.success; // 用户确认分享后执行的回调函数 }, cancel: function () { setWeixinShare.cancel; // 用户取消分享后执行的回调函数 } }); //获取“分享给朋友”按钮点击状态及自定义分享内容接口 wx.onMenuShareAppMessage({ title: setWeixinShare.title, // 分享标题 desc: setWeixinShare.desc, // 分享描述 link: setWeixinShare.link, // 分享链接 imgUrl: setWeixinShare.imgUrl, // 分享图标 type: setWeixinShare.type, // 分享类型,music、video或link,不填默认为link dataUrl: setWeixinShare.dataUrl, // 如果type是music或video,则要提供数据链接,默认为空 success: function () { setWeixinShare.success; // 用户确认分享后执行的回调函数 }, cancel: function () { setWeixinShare.cancel; // 用户取消分享后执行的回调函数 } }); //获取“分享到QQ”按钮点击状态及自定义分享内容接口 wx.onMenuShareQQ({ title: setWeixinShare.title, // 分享标题 desc: setWeixinShare.desc, // 分享描述 link: setWeixinShare.link, // 分享链接 imgUrl: setWeixinShare.imgUrl, // 分享图标 success: function () { setWeixinShare.success; // 用户确认分享后执行的回调函数 }, cancel: function () { setWeixinShare.cancel; // 用户取消分享后执行的回调函数 } }); //获取“分享到腾讯微博”按钮点击状态及自定义分享内容接口 wx.onMenuShareWeibo({ title: setWeixinShare.title, // 分享标题 desc: setWeixinShare.desc, // 分享描述 link: setWeixinShare.link, // 分享链接 imgUrl: setWeixinShare.imgUrl, // 分享图标 success: function () { setWeixinShare.success; // 用户确认分享后执行的回调函数 }, cancel: function () { setWeixinShare.cancel; // 用户取消分享后执行的回调函数 } }); //获取“分享到QQ空间”按钮点击状态及自定义分享内容接口 wx.onMenuShareQZone({ title: setWeixinShare.title, // 分享标题 desc: setWeixinShare.desc, // 分享描述 link: setWeixinShare.link, // 分享链接 imgUrl: setWeixinShare.imgUrl, // 分享图标 success: function () { setWeixinShare.success; // 用户确认分享后执行的回调函数 }, cancel: function () { setWeixinShare.cancel; // 用户取消分享后执行的回调函数 } }); }); }); } }); } function openX_ad(posterid, htmlid, width, height) { if ($(htmlid).length > 0) { var randomnumber = Math.random(); var now_url = encodeURIComponent(window.location.href); var ga = document.createElement('iframe'); ga.src = 'https://www1.elecfans.com/www/delivery/myafr.php?target=_blank&cb=' + randomnumber + '&zoneid=' + posterid+'&prefer='+now_url; ga.width = width; ga.height = height; ga.frameBorder = 0; ga.scrolling = 'no'; var s = $(htmlid).append(ga); } } openX_ad(828, '#berry-300', 300, 250);